As a new ScreenCoach account manager, navigating the app may seem like facing a new level in your child's favourite game. We get it! That's why this FAQ is here to equip you with the essential knowledge and tips to become a master strategist in managing your child's screen time. From setting limits to monitoring activity, each question tackles a key aspect of the app, allowing you to unlock its full potential and guide your child toward a balanced digital life. Dive in, explore, and unleash your ScreenCoach superpowers!
1. ScreenCoach Overview & Getting Started - Please watch this video
2. Install the ScreenCoach app on a Parent Device
- Go to the Apple Mobile App store or Google Play Store
- Search on ‘ScreenCoach’
- Download and install the App
- Login to your account
Remember to use the same email or google address you used to create your account.
Once you are logged in to ScreenCoach, select your own card and see your outstanding learning activities.
Watch Video Demo of Android Installation & Configuration ▶
3. Create an Activity and Assign it to someone.
On your Phone: From the main screen
Click on the pink ‘+’ button in the bottom right-hand corner
Choose an activity you would like to have completed in your home from the preset catalogue
You can now edit the defaults set from the catalogue activity
Click on the ‘+’ button to the right of the activity
Click in the assignee field and choose someone to complete the activity
Add a reward for completing the activity
Click ‘Save activity’
Be sure to check out other options, including
Checklists (for bigger goals/tasks)
Setting as completed if it has already been done
Auto approve (for trusted children)
Advanced options (allows you to add your own Catalogue item)

Using ScreenCoach for parents and kids- Quick guide
These 3-4 minute videos show parents and kids how to use ScreenCoach day-to-day.
It shows parents how to approve and assign activities to the kids.
It shows kids how to let ScreenCoach know they have done an activity that has been assigned to them so their parents can approve it. It also gives kids the ability to add a new activity they weren't tasked with for that day, so parents can either approve it or reject it. It also shows kids how they can ask for a bonus for an activity. For example, if they did it without being asked to. Or they did it with a good attitude.
There are more features to ScreenCoach which we will introduce you to later but getting across the information shared here will get you seeing the benefits of ScreenCoach in your home.
Note these videos may need to be updated because we may have changed the look, but it is very similar & will help
Short video for Kids:
ScreenCoach for kids - YouTube ▶
Short video for Parents:
ScreenCoach for parents - YouTube ▶
4.a: Approve an Activity + Bonuses
On your Phone: From the main screen
Look at the user’s cards for the counter called “for approval”
Select one of the user cards with activities waiting for approval
Click on the blue down arrow to the right of the activity for the child
Click on ‘Approve/Bonus’
Apply a bonus - it's your choice!!
Click Save
Be sure to check out other options, including
Rejecting and activity
Editing an activity
Approve all function
Watch Demo Video for Approving activity + Bonuses ▶
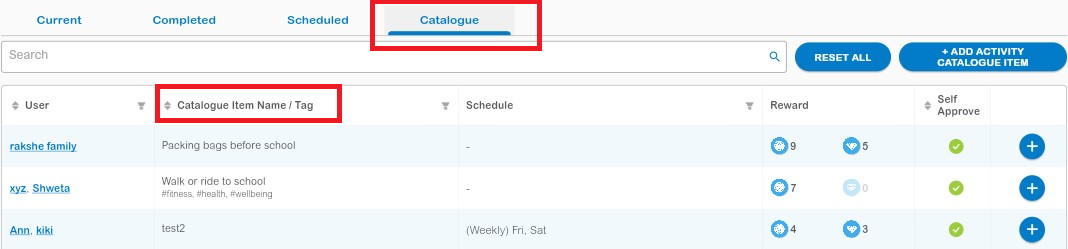
4.b: Add a new Activity Catalogue Item
The catalogue is the pre-prepared list you can copy from when you want to add new activities for your children.
You can add your own, delete or edit the one pre-prepared. They are great for jobs and things your want to occur regularly around your home.
To view the Activity Catalogue,
Go to the web portal at, https://manage.myscreencoach.com
- Click on the activities tab on the Left
- Select catalogue tab
On ScreenCoach mobile
- Press the bottom centre icon.
- Select catalogue tab

To add a new Activity Catalogue Record
On your Phone: From the main screen
Click on the ‘+’ button in the bottom right-hand corner (the same as adding a normal activity)
Instead of picking a catalogue item, type in the name of your new item and press the + on the right
If this is only for one user, add them. Otherwise, leave it empty for anyone
Add the Token / Gem rewards you want
If you want this to be auto-approved by a trusted child, enable “Auto approve”
Now save it as a catalogue item.
Select advanced option
Select “Save in activity catalogue”
Click ‘Save activity’
Be sure to check out other options, including
Checklists

On the web portal at, https://manage.myscreencoach.com
- Click on the activities tab on the left.
- Select 'catalogue' tab
- Press "Add Activity Catalogue item"
- Follow the same steps as you did on the phone (given above).
5. Edit Access Times (in a mode).
The access times are when kids can use their devices.
We do this in "Modes" to give flexibility during school term or on holidays or schoolwork mode etc
On Mobile: From the main screen
Click on the hamburger menu in the top left-hand corner
Scroll down and click the black arrow next to Admin.
Select Modes
Click on the ‘Fun’ mode (or the mode you want to edit)
Click on one of the access times in blue

Edit either the times or days as displayed;
Or add a new access time

Click Save
Note: This feature currently works better via the web portal, https://manage.myscreencoach.com on a bigger screen, as you can see the hours of the day filled in.
- Select "Modes" from the LHS menu.
- Click on the mode you want
- You will be in the "Access Times" tab
- click on the timeslot you want to edit or add a new one
Be sure to check out other options, including:
Adding a new access time using the red plus on the bottom right-hand corner
The Users tab to add and remove children from modes
Watch Demo Video to learn to Edit Access Times ▶
6. Edit a User's Time Allowance.
The time allowance is how much time you allocate to your children for "free" screen time before they need to earn Token time. This can be different for each day of the week.
This is to be set for each child.
Free Time is what kids are getting without needing to earn screen time tokens. Max time is an upper limit of the total screen time, they can use regardless of the amount of screen time tokens they earn.
Note: Set the max time too low, as you want kids to earn their screen time from completing activities that is token time.
On WebApp: From the dashboard
- On the top Right-Hand side of each person's card is a setting cog (or a ... menu)
- Click on the cog/ ...
- This takes you to the user's settings screen
- Select the “Time Allowance” tab
- Set the Time Allowance for each day.
- Click on the blue square to set the time allowance for the week.
Note: This max time will be used unless you have a mode that also has a lower max time for that same day
Be sure to look at the other options that can be set inside the other tabs in this COG.
7. Set a User's PIN
PINs are needed to protect users from accessing someone else's account.
Parents NEED to add a PIN.
If you only have one child, you don't need to use a PIN for them, or if you have honest kids!!! Then you can try going without them also :-)
On your Phone: From the main screen
Click on the settings cog next to the child's name
it may be a "..." menu on some devices (three dot menu).
This takes you to the users' settings
In the details tab, scroll down to the ‘PIN’ field
Enter a 4-digit number
Click outside the field
The PIN is set
If the kids forget their PIN, use these steps above to set it to something new.
This feature is ideal when there are devices child share, for example, an iPad or TV access, should you have the ScreenCoach box.
Be sure to check out other options in this area of ScreenCoach, including
Time allowance
System Configurations (set the token and gem value to anything you want in case of an error or punishment!)
User’s Notifications preferences
Watch Demo Video to set a User's PIN ▶
8. Install ScreenCoach on Child Device
Log into the Apple Mobile App store or Google Play Store
Search on ‘ScreenCoach’
Download
Install the App
Login to the account
Use the QR code for the fasted way to connect!
This will show a QR code on the screen & a pairing code.
Then on your parent mobile app, press the "Action" icon (lightning bolt ) and select "Link device"

Press the take photo button in the middle of the screen

Take a photo of the QR code that is showing on the child's device
This will link the child's device to the family account
If the child is not in the same house, they can copy and send you the pairing code to enter on the same screen
Alternatively, you can do an account log in with the same email or Google address you used to create your account.
Next, you need to set up the CRUCIAL STEPS to ensure that ScreenCoach is always running on the mobile devices.
On iPhone & iPad, ensure that location tracking is set to " Always allow"
On Android, the battery settings need to allow ScreenCoach to run in the background.
9. Set up App Blocking
Now to Set up App blocking.
For kid's mobile devices, it is important to block the apps when they are not allowed to use them.